Quick Start
Create your first order in 5 minutes
Step 0: Discover Your Customers (Optional but Recommended)
Before you can create an order, you need to know your customer IDs. Use the contacts API to discover them:
curl -X GET https://api.equos.one/e9v3/contacts \
  -H "Authorization: Bearer <your-token>" \
  -H "Content-Type: application/json"
Response:
{
  "success": true,
  "contacts": [
    {
      "contactId": "cust-123",
      "name": "Acme Corporation",
      "email": "orders@acme.com",
      "phone": "+1-555-1234"
    }
  ],
  "count": 1
}
Notes:
- Your token needs the
contacts:readscope - You can search by name:
?search=acme - Save the
contactIdto use in step 3
Step 1: Create an API Key
Visual Guide
Step 1a: Navigate to API Keys
- Go to console.equos.one
- Log in with your account credentials
- Click on Integrations in the left sidebar
- If you have more than one business, use the business picker at the top of Integrations to select the business this key should belong to
- Click on the API Keys tab
Each API key is bound to the business you select. Multi-business accounts can mint a separate key per business, or one key bound to several owned businesses. Classic (single-business) keys do not accept X-Business-ID — tenancy comes from the key. Multi-business keys require X-Business-ID on /e9v3.
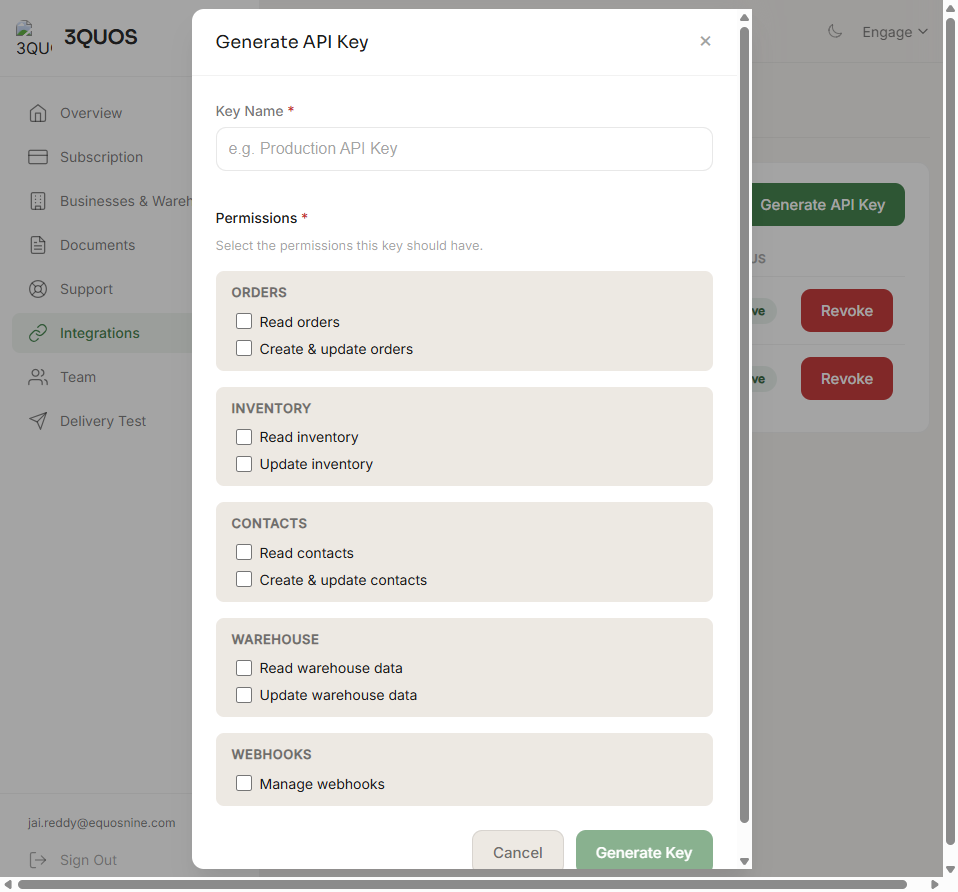
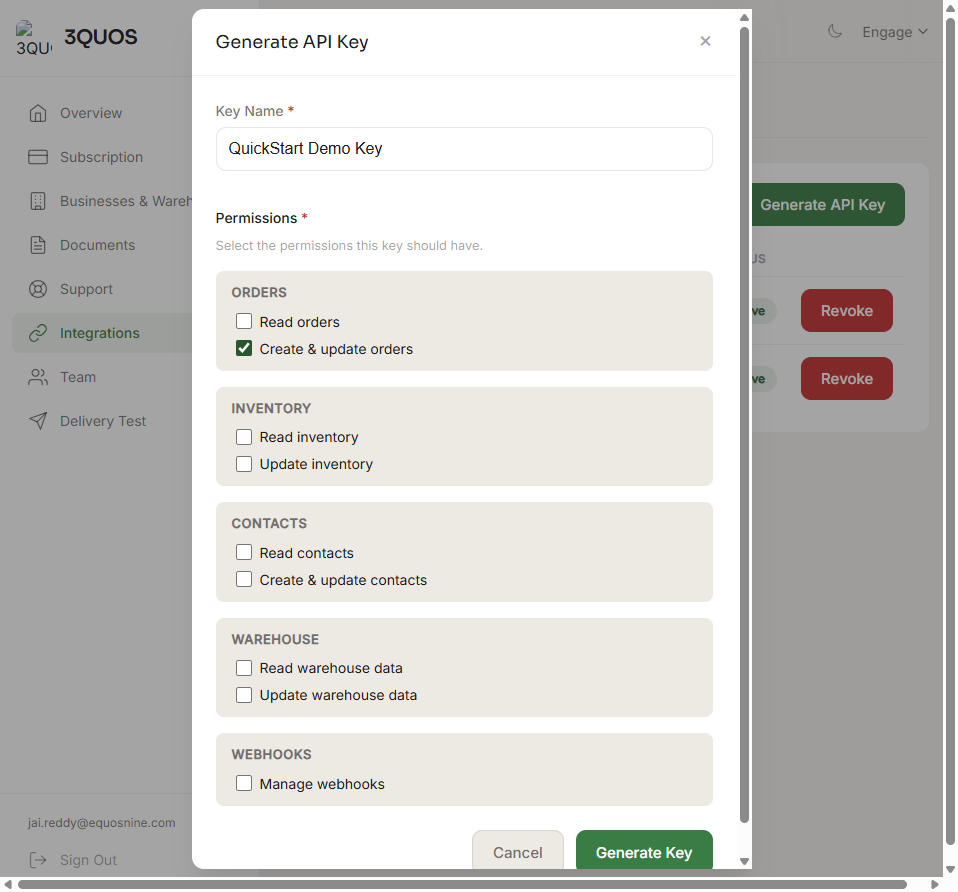
Step 1b: Fill in the API Key Details
- Click the Generate API Key button
- Enter a descriptive name for your key (e.g., “Production API Key”)
- Select the Permissions your integration needs:
- Orders: Read and create/update orders
- Inventory: Read and update inventory
- Contacts: Read and create/update contacts
- Warehouse: Read and update warehouse data
- Webhooks: Manage webhook subscriptions
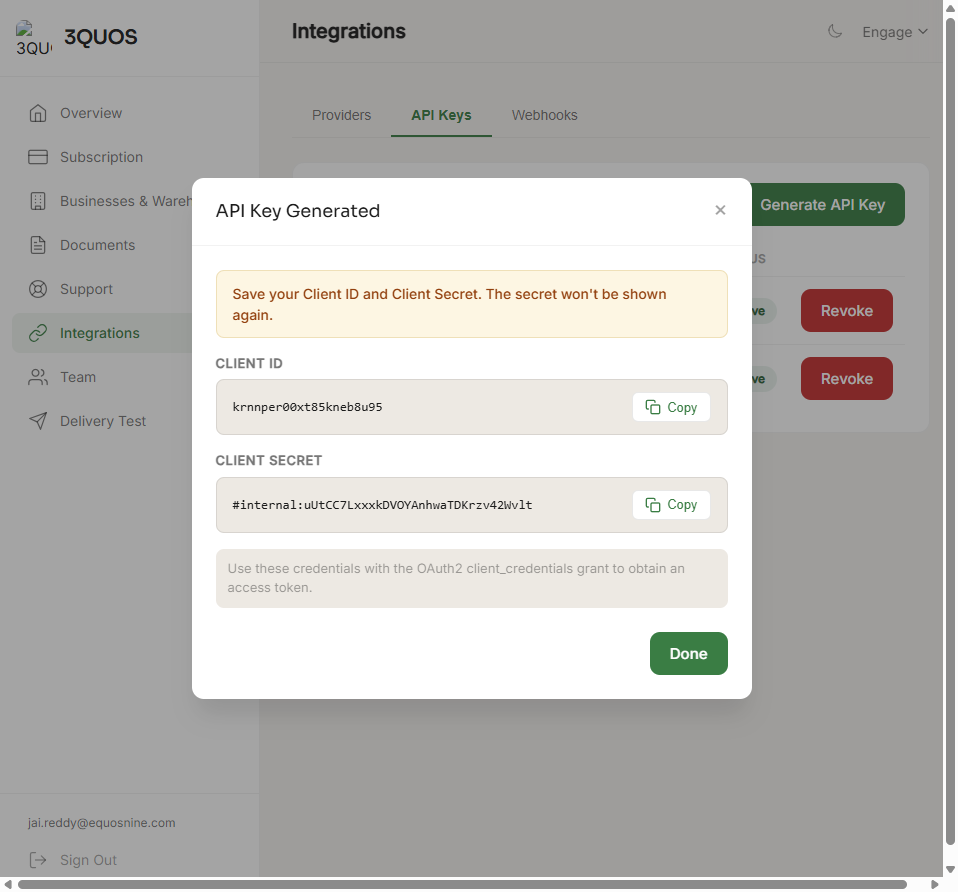
Step 1c: Save Your Credentials
- Click Generate Key
- A dialog will appear with your Client ID and Client Secret
- Copy both values immediately and store them securely—the secret won’t be shown again!
Important Security Notes
- Your Client Secret is sensitive—treat it like a password
- Never commit credentials to version control
- Use environment variables or secure config files to store your credentials
- Only OAuth 2.0 is supported. You’ll exchange these credentials for JWT tokens
Step 2: Get a JWT Token
Exchange your client ID and client secret for a JWT token using the OAuth 2.0 Client Credentials flow:
curl -X POST https://id.equos.one/oidc/token \
  -H "Content-Type: application/x-www-form-urlencoded" \
  -d "client_id=YOUR_CLIENT_ID" \
  -d "client_secret=YOUR_CLIENT_SECRET" \
  -d "grant_type=client_credentials" \
  -d "resource=https://api.equos.one" \
  -d "scope=orders:write"
See the Authentication page for detailed token request examples in Python, JavaScript, and cURL.
Step 3: Create an Order
Use the JWT token to create your first order via POST to /e9v3/orders/send:
curl -X POST https://api.equos.one/e9v3/orders/send \
  -H "Authorization: Bearer <your-token>" \
  -H "Content-Type: application/json" \
  -d '{
    "customerId": "cust-123",
    "items": [
      {
        "sku": "WIDGET-A",
        "productName": "Blue Widget",
        "quantity": 10
      }
    ]
  }'
Step 4: Monitor Status
HTTP 200 from create only means a background job was queued. The jobId in the response
(inbound_… or ext_send_…) is not an order id — do not call GET /e9v3/orders/send/{jobId}.
Poll the job until completed, then fetch result.orderId (ord_…) and note
result.orderNumber (minted WO-####). Optional reference1 is an external/PO ref only.
Ship-from uses shipFromLocationId or the portal defaultLocationId.
Track order processing using the job tracking API:
GET /e9v3/jobs/{jobId}The job will progress through states: pending → processing → completed/failed
Response Structure
Pending state (immediately after creation):
{
  "status": "pending",
  "jobId": "inbound_1718000000000000000",
  "createdAt": "2024-01-21T12:00:00Z"
}
Completed state:
{
  "status": "completed",
  "jobId": "inbound_1718000000000000000",
  "result": {
    "orderId": "ord_abc12345"
  },
  "completedAt": "2024-01-21T12:00:15Z"
}
Failed state:
{
  "status": "failed",
  "jobId": "inbound_1718000000000000000",
  "errorMessage": "validation failed: items[0].quantity must be greater than 0",
  "createdAt": "2024-01-21T12:00:05Z"
}
See the Examples page for code to poll this endpoint until completion.
What’s Next?
- Read the Endpoints documentation for full API reference
- Check Code Examples in Python, JavaScript, or cURL
- Review Rate Limiting best practices
- Subscribe to Webhooks for real-time event notifications